Distributed Proving
For testing purposes, the full Gentoo tree must be walked through the
resolver — tens of thousands of ebuilds — and even on capable hardware
that adds up. On a single machine, resolver:test_stats(portage) typically
finishes proving every single ebuild in a few minutes on a twenty-eight-core workstation — fast
enough for day-to-day development, but not the only shape the problem
takes.
What if you want the full tree proved faster than one box allows, or you want to drive resolution from a thin client that does not carry the whole knowledge base? portage-ng answers with a client–server–worker architecture: a server holds the Portage knowledge base and hands out proof jobs; workers pull work, run the proving pipeline, and push results back; clients submit targets and collect outcomes over the network. The sections below explain how that stack is wired, how discovery and TLS secure it, and how the same repository abstractions work whether you run standalone, on the server, or on a worker.
Architecture
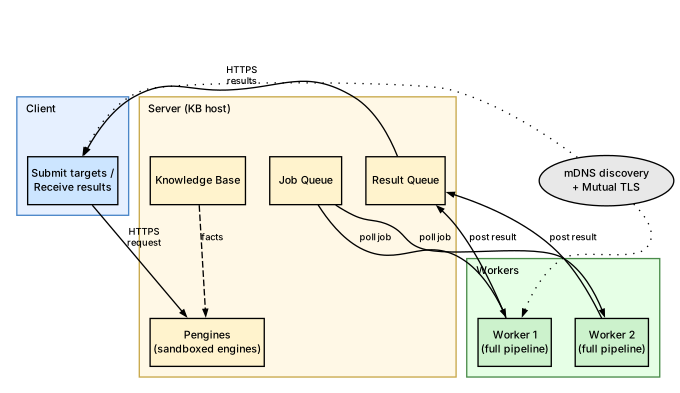
The diagram above shows the three roles. The server is the central hub: it holds the in-memory knowledge base, exposes an HTTP interface via Pengines (described below), and multiplexes proof jobs across workers through a job queue and result queue.
Workers are symmetric compute nodes. Each worker carries its own copy of the knowledge base and runs the full proving pipeline locally. You can add as many workers as you need — they scale horizontally, and the server distributes work evenly.
The client submits target packages and collects results. It does not need the knowledge base itself; it talks to the server over HTTPS and receives completed proofs as JSON.
Interaction flow
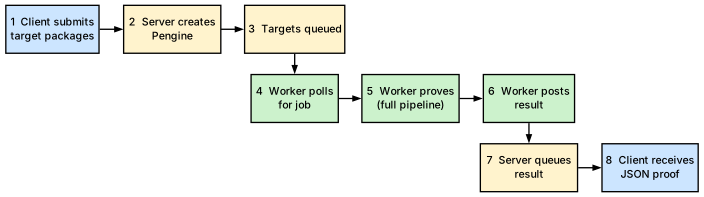
The numbered steps show how a proof request travels through the system:
Steps 1-3 (client to server). The client sends a target package
(e.g. sys-apps/portage) to the server over HTTPS. The server
creates a Pengine (a sandboxed Prolog engine) to handle the request
and adds the target to its job queue.
Steps 4-6 (worker loop). Workers continuously poll the job queue for work. When a worker picks up a job, it runs the full proving pipeline locally — proof search (resolving) and ordering — using its own copy of the knowledge base. When the proof is complete, the worker posts the result back to the server.
Steps 7-8 (results back to client). The server stores the completed proof in its result queue. The client retrieves the result as a JSON document over HTTPS.
Server
The server is the central coordination point. It runs an HTTP server backed by SWI-Prolog's Pengines library and manages four things: the knowledge base (the full Portage tree loaded in memory), a job queue of proof targets waiting to be processed, a result queue of completed proofs, and the Pengine sandbox that controls what remote callers can execute.
Worker
Each worker is an independent OS process with its own Prolog VM. On startup it loads the knowledge base, then enters a poll loop: it asks the server for the next job, runs the full pipeline (resolve and order), and posts the result back. Workers are stateless between jobs, so you can add or remove them at any time without affecting other workers or the server.
Client
The client is a thin request layer. It does not carry the knowledge base — it simply submits target packages to the server and collects the completed proofs. This makes it suitable for lightweight machines or scripts that want to drive resolution remotely.
Cluster orchestration
The cluster module sits above the individual roles and provides high-level orchestration: distributing a batch of targets across available workers, collecting results as they arrive, and handling failures (retrying jobs that a worker did not complete).
Pengines: Prolog as a network service
Pengines ("Prolog engines as a web service") is a library that ships with SWI-Prolog. It turns Prolog query execution into an HTTP-friendly protocol, and portage-ng uses it as the communication layer between clients and the server.
When a client sends a proof request, the server does not run the query in its main thread. Instead, it creates a Pengine — a fresh, isolated Prolog engine dedicated to that interaction. The Pengine can read the shared knowledge base (the Portage tree loaded in the server process), but it runs inside a sandbox that prevents it from modifying the knowledge base or calling dangerous predicates. Remote callers cannot reshape the server's state.
Answers are streamed back as JSON over HTTP. This means a client does not need to be a full Prolog application — any language that can make HTTP requests and parse JSON can drive proof search. From the outside, portage-ng looks like an ordinary web service that happens to do dependency resolution internally.
Repository state across modes
An important design question for distributed proving is: how does
each mode access the Portage tree? The answer is portage-ng's
object-oriented context system (see
Chapter 21). Each
repository is an instance created through that system, and methods
like portage:read populate the cache facts.
In server mode, repository instances live in the shared server process. All Pengine threads see the same instances and the same loaded knowledge — one tree in memory, many sandboxes reading it.
In worker mode, each worker is a separate OS process with its own Prolog VM. It creates its own repository instances and loads its own copy of the knowledge base. Nothing is shared with the server's address space.
The benefit is that the call sites are identical everywhere: the same
portage:read call appears in standalone, server, and worker code.
The object system dispatches to the right backing store depending on
the mode, so distributed proving does not require a separate set of
data-loading predicates.
Client installed state: --import-vdb
By default the server proves against its own VDB (the in-memory
pkg repository loaded by its kb:load). For a remote client whose
installed set differs from the server's, that would produce wrong
[nomerge], rebuild, and replaces decisions. The --import-vdb
client action closes this gap:
$ portage-ng --mode client --import-vdbThe client parses its local VDB (config:pkg_directory/1, typically
/var/db/pkg) through the regular repository sync path, serializes
the resulting cache: facts as a Prolog term stream with a snapshot
stamp (entry count + content hash), and POSTs the payload to the
authenticated /import-vdb endpoint (same digest + client-certificate
TLS as /sync).
The server validates the payload (whitelisted fact shapes, sanitized
hostname, capped counts) and registers the facts atomically as a
per-client repository named pkg@<clienthost>, recording the stamp.
At prove time, every rule that consults the installed set goes through
a single accessor, knowledgebase:vdb_repository/1:
- In standalone, server, and worker mode it resolves to the
local
pkgrepository — the behaviour is unchanged (the lookup is memoized per thread, so there is no hot-path cost). - Inside a Pengine serving a client request it resolves to that
client's
pkg@<clienthost>repository, using the repository name and import stamp the client ships with each RPC.
Stale or missing imports are loud, never silent: if a client has not
imported its VDB (or the stamp no longer matches what the server
holds), the server prints an explicit warning and falls back to its
own pkg repository, telling the user to (re-)run --import-vdb.
With config:client_auto_import_vdb(true) (the default) the import
happens automatically: before the first RPC of a client command
(--pretend, --merge, --search, ...) the client re-imports its
VDB whenever no import record exists for the target server or the
local VDB changed since the last import. Freshness is detected with
a cheap mtime check over the VDB root and its category directories,
so an up-to-date import adds no noticeable overhead. Set the flag to
false to ship the VDB only on an explicit --import-vdb.
Filesystem-level VDB reads (CONTENTS listings, on-disk SIZE files, binpkg live-VDB re-stat) can never work for a remote client; those paths detect a per-client repository and degrade to the imported in-memory snapshot, or are skipped. Worker mode is out of scope: workers load their own knowledge base and assume a homogeneous fleet.
mDNS/Bonjour discovery
Workers and servers discover each other automatically via mDNS/Bonjour service advertisement, so there is no need to hand-configure IP addresses.

The discovery protocol has three steps:
- Register — when the server starts, it advertises a
_portage-ng._tcpservice on the local network, making its hostname and port visible to any device on the same link. - Browse — workers browse for that service type and automatically receive the server's address and port.
- Connect — a connection is established from the discovery data, with no manual configuration required.
This is the same zero-configuration networking mechanism used by AirPrint, AirPlay, and many other network services.
Platform support
On macOS, the dns-sd command ships with the system. The
bonjour.pl module uses dns-sd -R to register the service and
dns-sd -B to browse for peers.
On Linux, the same dns-sd command is available through
Avahi (typically in the avahi-utils package). The bonjour
module hides the platform difference behind a single Prolog interface
(subprocess:dns_sd/...), so the rest of portage-ng does not need to
know which implementation is in use.
After discovery, all traffic is encrypted and mutually authenticated via TLS (see the following sections).
Sandbox and security
Because Pengines allow remote Prolog execution, the server must
control what clients can do. The sandbox module
(Source/Application/Security/sandbox.pl) enforces a whitelist: only
predicates explicitly registered as safe via sandbox:safe_primitive/1
and sandbox:safe_meta/2 can be called remotely. Everything else is
blocked.
A separate sanitise module (Source/Application/Security/sanitize.pl)
validates the structure of incoming queries before they reach the
sandbox, rejecting malformed or unexpected input early.
TLS certificates
All communication between server, workers, and clients is encrypted and mutually authenticated using TLS. Mutual authentication means that both sides present a certificate during the handshake — the server proves its identity to the client, and the client proves its identity to the server. This prevents unauthorized nodes from joining the cluster.
Certificate hierarchy
portage-ng uses a private Certificate Authority (CA) that acts as the trust root for the entire cluster. Every host-specific certificate is signed by this CA, so any node holding the CA's public certificate can verify any other node's identity.
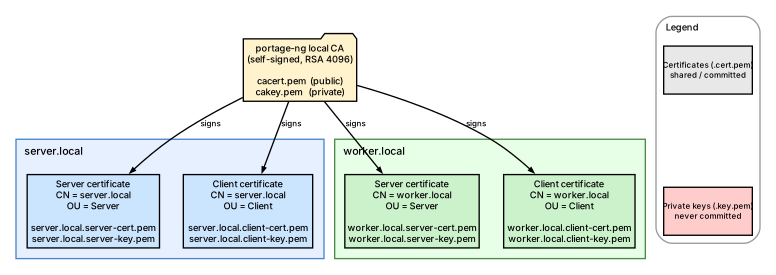
The CA is a self-signed RSA 4096-bit certificate valid for 10 years
(CERT_DAYS=3650). Each host receives two certificates signed by
the CA:
- A server certificate — presented when the host runs in
--mode server. The Common Name (CN) is set to the hostname and the Organizational Unit (OU) to "Server". - A client certificate — presented when the host connects to a server as a worker or client. The CN is the local hostname and the OU is "Client".
Both certificates use RSA 2048-bit keys and SHA-256 signatures.
File layout
All certificate files live under the Certificates/ directory at
the project root. The table below shows which files are tracked in
git (public certificates) and which are excluded (private keys):
| File | Tracked | Description |
|---|---|---|
cacert.pem |
Yes | CA public certificate (shared trust root) |
cakey.pem |
No | CA private key (never distributed) |
<host>.server-cert.pem |
Yes | Server certificate for <host> |
<host>.server-key.pem |
No | Server private key |
<host>.client-cert.pem |
Yes | Client certificate for <host> |
<host>.client-key.pem |
No | Client private key |
passwordfile |
No | HTTP digest authentication passwords (make passwordfile) |
Private keys and the CA serial file are excluded via .gitignore.
The public certificates are committed so that nodes can verify each
other without manual file copying — only the shared cacert.pem
needs to be distributed out-of-band.
Mutual TLS handshake
When a worker or client connects to the server, a mutual TLS handshake takes place. Both sides verify the other's certificate against the shared CA before any data is exchanged.
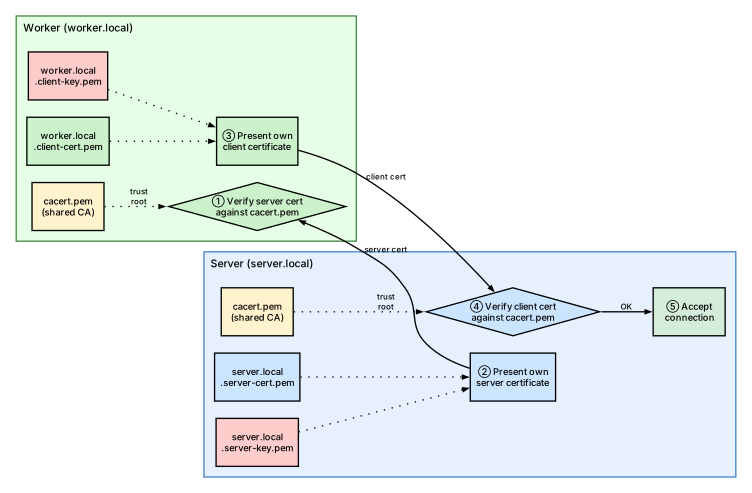
The handshake proceeds in five steps:
- The server presents its server certificate
(
server.local.server-cert.pem), signed by the CA. - The worker verifies this certificate against its local copy
of
cacert.pem. If verification fails (wrong CA, expired, CN mismatch), the connection is refused. - The worker presents its client certificate
(
worker.local.client-cert.pem), also signed by the same CA. - The server verifies this certificate against its own
cacert.pem. This step is what makes the authentication mutual — the server confirms the worker is a legitimate cluster member, not just any TLS client. - Both sides accept the connection and begin encrypted communication.
On the server side, the TLS context is configured in
server:start_server with peer_cert(true) to require client
certificates, and cacerts([file(CaCert)]) to set the trust
anchor. On the client/worker side, client:rpc_execute
configures the same CA and presents the local client certificate.
An additional layer of security is provided by HTTP digest
authentication (passwordfile), so even a node with a valid
certificate must also know the correct username and password.
Set the plaintext once in Source/Config/Private/passwords.pl, then
derive the hashed server file (it is not committed):
cp Source/Config/Private/template_passwords.pl \
   Source/Config/Private/passwords.pl
# edit config:digest_password/2
make passwordfile
Ship the same passwords.pl to every client and worker.
How certificates are resolved at runtime
Certificate paths are computed at runtime by config:certificate/2
and config:certificate/3. Given a certificate name like
server-cert.pem, the predicate prepends the installation
directory and Certificates/ to form the full path. For
host-specific certificates, the hostname is prepended to the
filename (e.g. mac-pro.local.server-cert.pem).
When TLS files are missing, both server:require_tls_files/4 and
client:require_tls_files/4 print an error message listing the
expected file paths and the make certs command needed to generate
them.
Generating certificates
To generate a full set of certificates for a host:
make certs HOST="$(hostname)"If your hostname includes a .local suffix (common on macOS), pass
the full name so it matches config:hostname/1:
make certs HOST="mac-pro.local"This runs Certificates/Scripts/generate.sh, which creates three
things:
- A self-signed CA (
cacert.pem+cakey.pem) — created only if it does not already exist, so adding a second host reuses the same CA. - A server certificate and key signed by that CA, with the hostname embedded as the Common Name (CN).
- A client certificate and key signed by the same CA.
Checking and renewing
Certificates are valid for 10 years, but the generation script also supports health checks and renewal:
make certs-check                # show expiry status for all hosts
make certs-renew                # renew certs expiring within 30 days
The --check subcommand prints each certificate's expiry date and
flags any that are missing or expiring soon. The --renew
subcommand regenerates only the certificates that need it, reusing
the existing CA and private keys.
Encrypted two-node cluster: step-by-step
The following walkthrough shows how to set up a minimal cluster with one server and one worker on a local network.
Step 1 — Generate certificates on each machine.
On the server host (e.g. server.local):
make certs HOST="server.local"On the worker host (e.g. worker.local):
make certs HOST="worker.local"Each machine now has its own certificate and key, signed by a locally created CA.
Step 2 — Share the trust root.
By default, each machine creates its own CA. For mutual
authentication to work, all nodes must trust the same CA. Copy
cacert.pem from the server to the worker (or designate one machine
as the cluster CA and distribute its cacert.pem to all nodes).
Each node keeps its own host-specific certificate and key.
Step 3 — Start the server.
portage-ng --mode serverThe server loads the knowledge base and listens on
config:server_bind/1:config:server_port/1 (default
localhost:4000). Mutating POSTs (/sync, /clear, /load, …)
therefore stay off the public network. Widen the bind
(config:server_bind(*)) only on a trusted VPN/LAN — with a shared
cluster CA, mTLS alone is not a strong gate; digest + bind scope are.
Step 4 — Start the worker.
portage-ng --mode worker --host server.localPrefer an explicit --host (or a matching config:server_host/1
pin). Bonjour discovery is allowed only as a convenience lookup that
still must match that pin — the worker never connects to the first
untrusted advertisement on a hostile LAN.
Before tree sync, fetch the portage git objects from your trusted
remote (not from the Pengine server). The server advertises a full
commit SHA; the worker checks it out only when that object already
exists locally (git cat-file -e). There is no fetch-from-server path.
Step 5 — Discovery (optional).
If mDNS/Bonjour is available, the worker may resolve
_portage-ng._tcp advertisements, but only a host that matches
config:server_host/1 is accepted.
Step 6 — Mutual TLS handshake.
When the worker connects, both sides present certificates signed by the shared CA. portage-ng verifies the Common Name and role, so only nodes with valid credentials can join the cluster. Digest auth is still required on top of mTLS.
Step 7 — Proving.
The worker polls the server's job queue, runs the full proving pipeline for each target, and posts results back. The server collects completed proofs and makes them available to clients.
Cluster usage
To run a distributed cluster, every node needs two things:
- A copy of the same
cacert.pem(the shared trust root). - Its own host-specific certificate and key pair.
The server is started with --mode server, and each worker with
--mode worker --host <pinned-server>. Pin config:server_host/1
on workers; Bonjour is only a lookup aid against that pin. TLS
ensures peers share the same CA, and digest auth supplies the shared
secret. You can add more workers at any time — they connect to the
pinned server and start picking up jobs immediately.
Further reading
- Chapter 2: Installation and Quick Start — dns-sd and openssl prerequisites
- Chapter 15: Command-Line Interface —
--modeflags - Chapter 4: Architecture Overview — module load order for different modes